
This document describes how to integrate one
or more third-party webinar services with
ShareKnowledge 11.2 (or earlier). This
will
allow for creating online events in
ShareKnowledge.
Supported Webinar Services
Prerequisites
Internet access is required for webinar
connectors.
Ask the Skype for Business server administrator to send you a file copy of the certificate chain that is used by the Skype for Business server.
Go to the server where you will install the webinar connector (see the "Webinar Connector Architecture Diagram" section below) and perform the following two actions:
Download and install Unified Communications Managed API 5.0 Runtime.
Install this certificate chain as described here.
TLS 1.2 must be enabled on the server where you
will install the webinar connector (see the
“Webinar Connector Architecture Diagram”
section below).
To verify that TLS 1.2 is enabled, open the Registry Editor and make sure that the "SchUseStrongCrypto" key is set to 1 in the following locations:
HKLM:\SOFTWARE\Wow6432Node\Microsoft\.NetFramework\v4.0.30319
HKLM:\SOFTWARE\Microsoft\.NetFramework\v4.0.30319
If the key is missing there, you can add it by running the following commands in the PowerShell and then restart the machine:
Set-ItemProperty -Path 'HKLM:\SOFTWARE\Wow6432Node\Microsoft\.NetFramework\v4.0.30319' -Name 'SchUseStrongCrypto' -Value '1' -Type DWord
Set-ItemProperty -Path 'HKLM:\SOFTWARE\Microsoft\.NetFramework\v4.0.30319' -Name 'SchUseStrongCrypto' -Value '1' -Type DWord
See also the article.
Webinar Connector Architecture Diagram
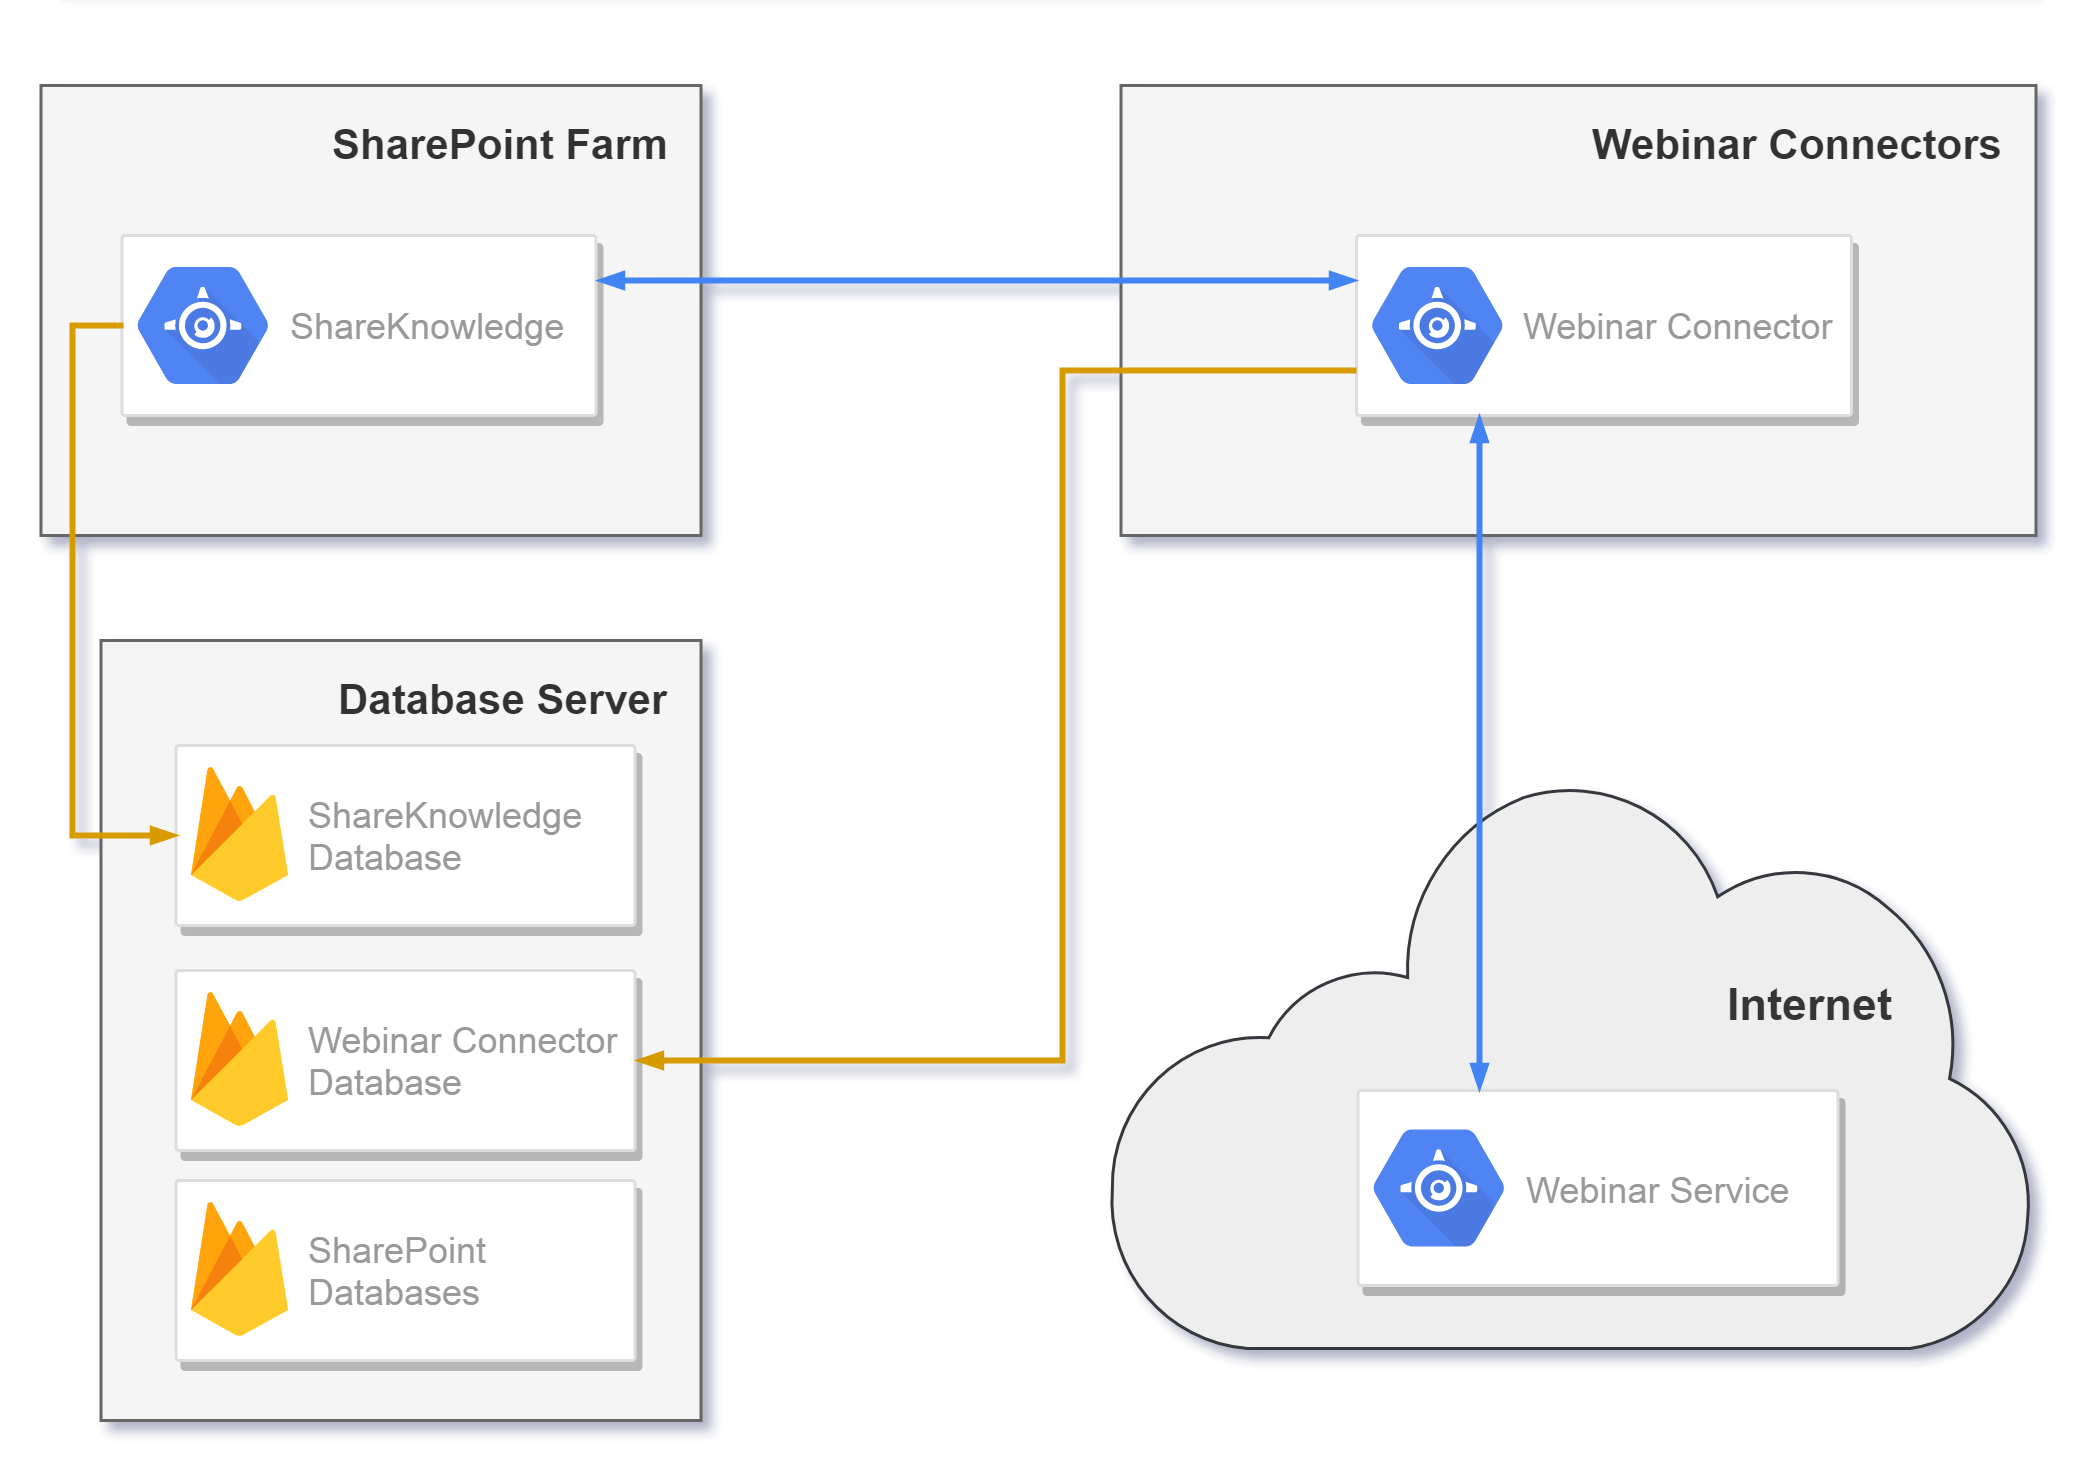
Webinar connectors can be located on a separate server or on one of the servers of your SharePoint farm.
A webinar connector database can be located on the same SQL server as the ShareKnowledge database or on a separate SQL server.
For each webinar connector, you should create a separate webinar connector database.
For each webinar connector, you should create a separate site in IIS.
How to Set Up Integration with a Webinar
Service
Download Webinar Connector Package
Download a webinar connector package here and unzip it to any folder.
The package contains the “webinar.sql” script for creating a webinar connector database, and files required for the IIS site that will be created later.
Create New Database
Create a webinar connector database:
Open SQL Server Management Studio and create a new DB.
Open a new query window, select the just created DB and run script “webinar.sql”
Create New IIS Website
Create a new site for the webinar connector in IIS:
Create a new folder that will be used as the physical path for this site.
Copy the unzipped package's content (excluding the "webinar.sql" file) to this folder.
Open "IIS Manager" - [server name] - "Sites" - "Add Website".
"Physical Path" must point to the site's folder. The server where the site's folder is located must be in the same network as your SharePoint farm.
Choose a site name.
Choose a free port.
Choose a user for the site's application pool:
Open "IIS Manager" - [server name] - "Application Pools" - [webinar connector site name] - "Advanced Settings" - "Identity"
User must have the following privileges:
Read and write permissions for the website’s folder.
Read and write permissions on the database if the "Integrated Security" option is set to "True" (the "db_datareader" and the "db_datawriter" fixed database roles are sufficient).
Edit "Web.config" of Webinar Connector
Go to the website’s folder and open the "Web.config" file.
Find the "connectionStrings" section:
<connectionStrings>
    <add name="WebinarContext" connectionString="data source=(local);initial catalog=Webinar;integrated security=True;MultipleActiveResultSets=True;App=EntityFramework" providerName="System.Data.SqlClient" />
  </connectionStrings>
Edit the following fragment (see about connection strings here):
data source=(local);initial catalog=Webinar;integrated security=True;MultipleActiveResultSets=True;App=EntityFramework"Data source": the name or network address of the instance of SQL Server to connect to.
"Initial catalog": the name of the database that was created earlier.
Edit the "IWebinarEventOperationFactory" section:
1. Cisco WebEx Meetings:Edit the "IWebinarEventOperationFactory" section, which can be found in the "Web.config" file of your webinar connector, according to the table below:
<register type="IWebinarEventOperationFactory" mapto="ShareKnowledge.Webinars.WebEx.WebinarEventOperationFactory, ShareKnowledge.Webinars.WebEx">
   <lifetime type="singleton"/>
   <constructor>
     <param name="webExId" type="System.String">
       <value value="eventadmin"/>
     </param>
     <param name="password" type="System.String">
       <value value="Passw0rd"/>
     </param>
     <param name="siteName" type="System.String">
       <value value="company"/>
     </param>
     <param name="siteId" type="System.String">
       <value value=""/>
     </param>
     <param name="centerType" type="System.String">
       <value value="Meeting"/>
     </param>
     <param name="template" type="System.String">
       <value value=""/>
     </param>
     <param name="allowAnyoneHostMeeting" type="System.String">
       <value value=""/>
     </param>
     <param name="issueHostUrlForHost" type="System.String">
       <value value=""/>
     </param>
   </constructor>
</register>
Parameter Description webExId The Webex ID. password The user password. siteName You can copy this value from the URL: https:// [sitename].webex.com. siteId The Site ID. This field should be left blank. centerType Type "Meeting" in this field if you want to create WebEx Meetings. Other WebEx activity types are not supported.template You might use the parameter "template" to use WebEx templates to create events in ShareKnowledge.If you do not use templates, you should leave this parameter blank.Otherwise, enter the name of template from WebEx.It is highly recommended that you enable the following options in your template: 1) "Attendees can join meeting N minutes before start time"; 2) "Guests can join the meeting" or "Guests wait in the lobby until the host admits them".allowAnyoneHostMeeting The value for property "Let anyone with a host account on this site host my meeting" is taken from this parameter (irrespective of whether WebEx templates exist or not)."True" = checked."False" or a blank value = deselected.issueHostUrlForHost This option is responsible for generating "Go to Webinar" links for training administrators and internal trainers on pages of the ShareKnowledge LMS."False" or a blank value = the GetjoinurlMeeting URL is used in "Go to Webinar" links. We strongly recommend using this mode for better security."True" = the GethosturlMeeting URL is used in "Go to Webinar" links. This mode is NOT recommended and NOT secure because any trainer or training administrator who follows a "Go to Webinar" link will be automatically logged in your WebEx site with the credentials given in the "webExId" and the "password" fields, which will give them administrator permissions for the WebEx site. This mode has a known issue: "Go to Webinar" links located on the "Edit Event" page in ShareKnowledge are one-time links, and refreshing the page is required to get a new link there; "Go to Webinar" links located on other pages of ShareKnowledge are usual links rather than one-time links.
2. Adobe Connect:Edit the "IWebinarEventOperationFactory" section, which can be found in the "Web.config" file of your webinar connector, according to the table below:
<register type="IWebinarEventOperationFactory" mapto="ShareKnowledge.Webinars.AdobeConnect.WebinarEventOperationFactory, ShareKnowledge.Webinars.AdobeConnect">
   <lifetime type="singleton"/>
   <constructor>
     <param name="baseurl" type="System.String">
       <value value="http://meet12345678.adobeconnect.com"/>
     </param>
     <param name="login" type="System.String">
       <value value="eventadmin@company.com"/>
     </param>
     <param name="password" type="System.String">
       <value value="Passw0rd"/>
     </param>
     <param name="accountId" type="System.String">
       <value value="1234567890"/>
     </param>
     <param name="useSeminarRooms" type="System.String">
       <value value="false"/>
     </param>
    </constructor>
</register>
Parameter Description baseurl The "Account URL" field in Adobe Connect (e.g. http://meet12345678.adobeconnect.com). Please use "http" instead of "https" here. login The "Username" field in Adobe Connect, which is the email address that you provided during the registration. password The "Password" field in Adobe Connect. accountId This ID can be retrieved from the following URL: http://meet12345678.adobeconnect.com/api/xml?action=common-info, where http://meet12345678.adobeconnect.com/ is the "Account URL" field. You should follow this link and find the "account-id" field there.Alternatively, you should select "Administration" - "Account Summary" - "Account Information"; this ID is the second part of the "Name" field (the digits after the hyphen).useSeminarRooms "true" = use Adobe Connect seminars;"false" = do not use them.
3. Skype for Business:Edit the "IWebinarEventOperationFactory" section, which can be found in the "Web.config" file of your webinar connector, according to the table below:
<register type="IWebinarEventOperationFactory" mapto="ShareKnowledge.Webinars.SkypeForBusiness.WebinarEventOperationFactory, ShareKnowledge.Webinars.SkypeForBusiness">
   <lifetime type="singleton"/>
   <constructor>
     <param name="isSipEnabled" type="System.Boolean">
       <value value="false"/>
     </param>
     <param name="isPassKeyEnabled" type="System.Boolean">
       <value value="false"/>
     </param>
     <param name="applicationUserAgent" type="System.String">
       <value value="Webinars.Service"/>
     </param>
     <param name="conferenceAccessLevel" type="System.String">
       <value value=""/>
     </param>
     <param name="serverName" type="System.String">
       <value value="sip.company.com"/>
     </param>
     <param name="ownerUri" type="System.String">
       <value value="sip:eventadmin@company.com"/>
     </param>
     <param name="userName" type="System.String">
       <value value="eventadmin"/>
     </param>
     <param name="domain" type="System.String">
       <value value="DOMAIN"/>
     </param>
     <param name="password" type="System.String">
       <value value="Passw0rd"/>
     </param>
     <param name="ldapPath" type="System.String">
       <value value=""/>
     </param>
   </constructor>
</register>
Parameter Description isSipEnabled Sets a value for the ConferenceScheduleInformation.
PhoneAccessEnabled property.When it is set to "true", participants can join the conference over the phone.Available values: "true" and "false".isPassKeyEnabled If you set it to "true", conference passcodes will be added to training events' URLs.Available values: "true" and "false".applicationUserAgent The string is used to identify this application (i.e. the Skype for Business webinar connector).The default text is "Webinars.Service".See also here.conferenceAccessLevel This property is not used.serverName The Skype For Business server URL. ownerUri The user’s Skype For Business server login.This user has access to Skype For Business and can create conferences. For example: "sip:johndoe@example.com".userName The user name (of the user specified in the "ownerUri" property). domain The user domain. password The user password. ldapPath This property is not used.
4. Zoom:We support Zoom Meetings and Zoom Rooms. Zoom Webinars are not supported.
You should have a Zoom account.
Sign in marketplace.zoom.us - click "Develop" in the top bar - "Build App" - create a JWT application to generate your API Key & Secret.
Sign in zoom.us - click "My Account" - go to the "Users" item of the "User Management" section and the "Zoom Rooms" item of the "Room Management" section:
- In the
case of
Zoom
Meetings,
it is a
good
practice
to add
all
ShareKnowledge
training
administrators
as
users to
your Zoom
account
to allow
them to
hold
several
events
scheduled
at the
same or
overlapping
dates
and time.
The same
principle
applies
to Zoom
Rooms.
- There is
no need
to add
regular
ShareKnowledge
learners
as users
to your
Zoom
account.
- In the
case of
Zoom
Meetings,
it is a
good
practice
to add
all
ShareKnowledge
training
administrators
as
users to
your Zoom
account
to allow
them to
hold
several
events
scheduled
at the
same or
overlapping
dates
and time.
The same
principle
applies
to Zoom
Rooms.
Integration with Zoom Meetings and Zoom Rooms is being performed in the same way:
- For Zoom
Meetings,
you
will need
to
specify a
user ID in
the
"rooms"
parameter
(see the
table
below).
- For Zoom
Rooms:
when you
create a
room at zoom.us,
Zoom
automatically
creates
a service
user who
corresponds
to
this room.
You will
need to
specify
this
service
user's ID
in
the
"rooms"
parameter
(see
the table
below).
- For Zoom
Meetings,
you
will need
to
specify a
user ID in
the
"rooms"
parameter
(see the
table
below).
Edit the "IWebinarEventOperationFactory" section, which can be found in the "Web.config" file of your webinar connector, according to the table below:
<register type="IWebinarEventOperationFactory" mapto="ShareKnowledge.Webinars.Zoom.WebinarEventOperationFactory, ShareKnowledge.Webinars.Zoom">
   <lifetime type="singleton"/>
   <constructor>
     <param name="apiKey" type="System.String">
       <value value="xSFQA3KqR3GmT9YCEal-tE"/>
     </param>
     <param name="apiSecret" type="System.String">
       <value value="fIARySwRqHYPewKhGCwbYjQZb7PXUgsYUbSA"/>
     </param>
     <param name="folderName" type="System.String">
       <value value="Zoom"/>
     </param>
     <param name="rooms">
       <array>
         <value value="8;Slot 1;IN2bzRcRT_aF1ZS8EI3KKL"/>
         <value value="9;Slot 2;VQeFKB22SowqJQl7vc6Cow"/>
       </array>
     </param>
   </constructor>
</register>
Parameter Description apiKey The API Key of your JWT application. apiSecret The API Secret of your JWT application. folderName A display name for the "License" field on the event creation and edit pages in ShareKnowledge. rooms Each entry for this array consists of three fields separated by semicolon. You can add more entries if necessary.The first field is not used but you should specify a positive integer to avoid errors.The second field sets a display name for the "Room" field on the event creation and edit pages in ShareKnowledge.The third field must contain the ID of a user who was created in your Zoom account; Zoom Meetings / meetings in Zoom Rooms will be created on behalf of this user; you can get this user ID as follows: go to zoom.us - "My Account" - open the "User Management" section - "Users" - click the user - copy the user ID from the profile page URL, e.g.: https://us05web.zoom.us/user/user_id/profile.
5. Microsoft Teams:We support Teams meetings. Teams live events are not supported.
You should have an active Office 365 subscription.
Go to "Microsoft 365 Admin Center" - click "Show All" in the sidebar - click "Azure Active Directory" in the "Admin Centers" section.
"Azure Active Directory Admin Center" will open. Click "Azure Active Directory" in the sidebar - "App Registrations" - "New Registration" - specify an arbitrary name (e.g. "App Registration for Microsoft Teams") - select "Accounts in this organizational directory only" from the "Supported Account Types" section - leave the "Redirect URI" field blank - "Register".
This application's page will open. In the "Overview" section, you can see the "Application (client) ID" and the "Directory (tenant) ID", which will be needed later.
In "Certificates & Secrets", create a new client secret for this registered application. It will be displayed once, so copy and keep it in a safe place. It will be needed later.
In "API Permissions", click "Add a Permission" - "Microsoft Graph" - "Application Permissions" - give the "Calendars.ReadWrite" permission - grant the admin consent.
Edit the "IWebinarEventOperationFactory" section, which can be found in the "Web.config" file of your webinar connector, according to the table below:
<register type="IWebinarEventOperationFactory" mapto="ShareKnowledge.Webinars.Teams.WebinarEventOperationFactory, ShareKnowledge.Webinars.Teams">
   <lifetime type="singleton"/>
   <constructor>
     <param name="appId" type="System.String">
       <value value="8e65wq97-f52d-610f-aw29-89257610qa7v"/>
     </param>
     <param name="tenantId" type="System.String">
       <value value="6580a431-ac7d-46tj-7211-q3eh890e320"/>
     </param>
     <param name="appSecret" type="System.String">
       <value value="5CEW632tQAj-xOR2dwgjJW9j~RT.-jRu_P"/>
     </param>
     <param name="adminId" type="System.String">
       <value value="115e43w6-24rr-4968-9634-811678r68cdm"/>
     </param>
   </constructor>
</register>
Parameter Description appId The ID of your registered application. tenantId The tenant ID of your Azure Active Directory. appSecret The API Secret of your registered application. adminId The ID of a user on behalf of which meetings will be created. This user must be a licensed user.To get users IDs, go to "Azure Active Directory Admin Center" - "Azure Active Directory" - "Users" - click on the user you need - locale the "Object ID" field. To assign a license, go to "Microsoft 365 Admin Center" - "Users" - "Active Users" - click the user's display name - "Licenses and Apps".
<system.diagnostics>
    <trace autoflush="true">
      <listeners>
        <add name="hpvr.log" type="System.Diagnostics.TextWriterTraceListener" initializeData="hpvr.log" traceOutputOptions="ThreadId, DateTime" />
      </listeners>
    </trace>
</system.diagnostics>
Check Availability of Webinar
Connector
Open the http://your_webinar_connector_IIS_site/HPVRWebinarManager.svc page in a web-browser from any server of your SharePoint farm. This page must be accessible from all servers of your farm.
The webinar connector is accessible from this server if you can see this page:
 .
.If you cannot see the page, make sure the "HTTP Activation" feature is enabled (".NET Framework 4.5" or later - "WCF Services" - "HTTP Activation").
Edit "Web.config" of
ShareKnowledge
Run "IIS Manager" on the server where ShareKnowledge is deployed - "Sites" - [the ShareKnowledge site] - "Explore" - open the "web.config" file.
Edit the "system.serviceModel" section as follows:
<system.serviceModel> <serviceHostingEnvironment aspNetCompatibilityEnabled="true"/> <client> <endpoint address="http://webinarConnectorSite:8087/HPVRWebinarManager.svc" binding="basicHttpBinding" contract="ServiceReference.IWebinarManager" name="Cisco WebEx Meetings"/> </client> </system.serviceModel>- Specify your custom
"endpoint
address" and
"name":
- An "endpoint address"
points
to the
IIS
site where a
corresponding
webinar
connector is
hosted.
- The "name" field is a
display
name for
this webinar
connector, which
will be
shown on the event
creation
and edit
pages
in
ShareKnowledge.
- If you are setting up more than one webinar connector, each webinar service requires a separate "endpoint address" string:
<system.serviceModel>
  <serviceHostingEnvironment aspNetCompatibilityEnabled="true"/>
    <client>
       <endpoint address="http://webinarConnectorSite:8087/HPVRWebinarManager.svc" binding="basicHttpBinding" contract="ServiceReference.IWebinarManager" name="Cisco WebEx Meetings"/>
       <endpoint address="http://webinarConnectorSite:8088/HPVRWebinarManager.svc" binding="basicHttpBinding" contract="ServiceReference.IWebinarManager" name="Adobe Connect"/>
    </client>
</system.serviceModel>
Final Check
Create a new instructor-led training in ShareKnowledge.
Create a new online event in ShareKnowledge: go to the event creation page, click on the "Format" field, select the webinar service that you have just configured, fill out the remaining fields on this page, and click the "Create" button. This event must be successfully created in ShareKnowledge without errors.
Sign in the webinar service's website and make sure that a new event has been created there. If it is successfully created, then integration with this webinar service is completed.